
Appearance
Build an intake form
An intake form is a questionnaire you send to someone outside your organization. They fill it in; CryptoComply turns the answers into a profile — or a set of blockchain addresses — and screens it.
Access
Gated by feature flag and by RBAC. If Intake Forms is missing from the sidebar, or a button is greyed out, ask an organization admin.
There are two ways to build one, and they produce the same thing:
- Build it yourself in the editor — sections 1 to 10 below.
- Ask CryptoComply AI to build it for you, then open it in the editor like any other form.
Four things to know first
- Questions come from your field catalog. You pick from the fields your organization already collects; you do not invent a question and hope it lands somewhere. That is why an answer reaches the profile without anyone re-typing it.
- A draft holds anything. Publishing does not. Save a half-built form and come back. Publishing is where the checks run.
- Publishing freezes a copy. Respondents answer the published copy, so editing a live form never changes what someone is halfway through.
- You can test everything without leaving a trace. See Test before you publish.
1 · Create the form
Intake Forms → Create Intake Form.
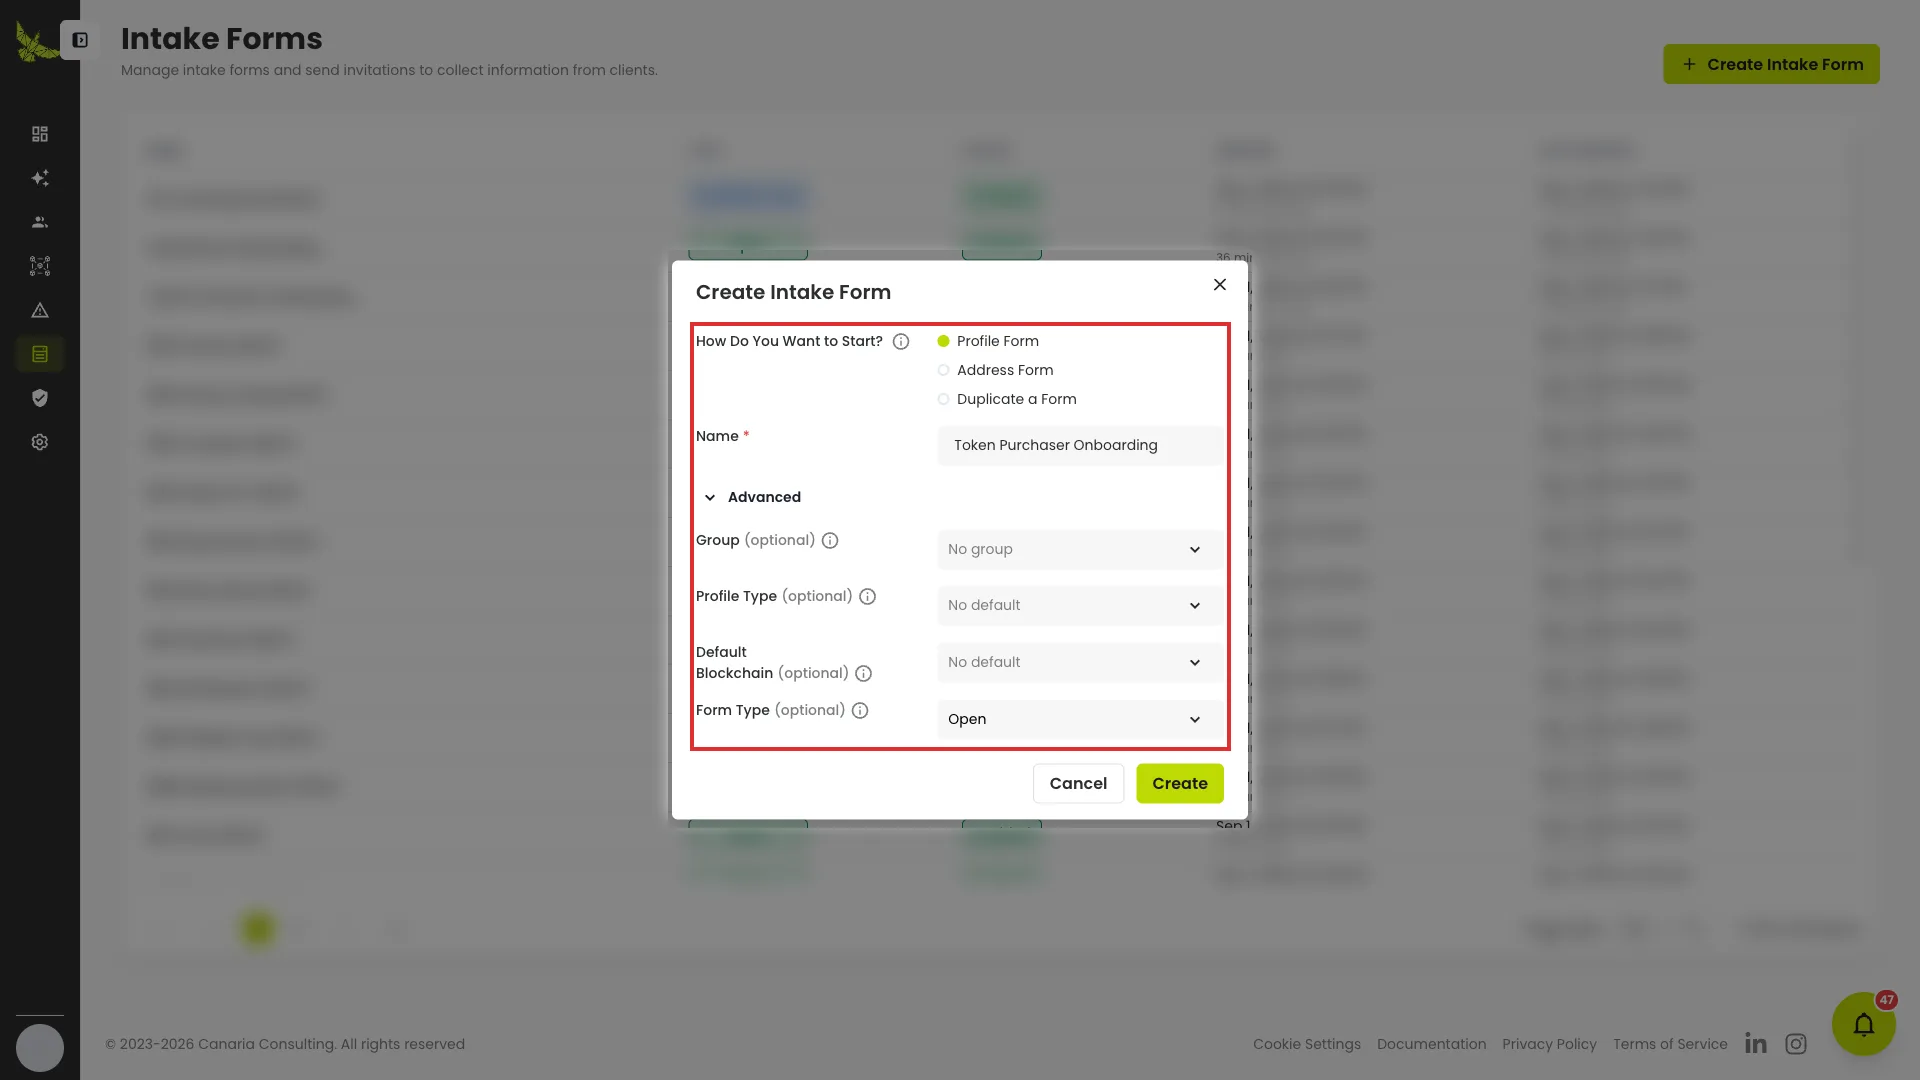
Three starting points:
| Creates | Use when | |
|---|---|---|
| Profile Form | A profile, its related parties and wallets | Onboarding a client |
| Address Form | Blockchain addresses only | Collecting wallets from someone you already hold |
| Duplicate a Form | A copy of an existing form's questions and settings | Starting from one that works |
Everything under Advanced is optional and changeable later — except the type above, which is fixed at creation.
The three defaults
Each has the same rule: fix it here, or make the form ask.
| Default | Fix it, or… |
|---|---|
| Profile type | Leave blank and the form asks "individual or company?" |
| Group | Leave blank and the form asks which group |
| Blockchain | Leave blank and every wallet row asks for its chain |
Setting neither is the one thing publishing will not allow — a submission would have nowhere to land. An address form needs no group and no profile type.
2 · Build the questions
Five tabs: Builder, Logic, Style, Email, Settings.
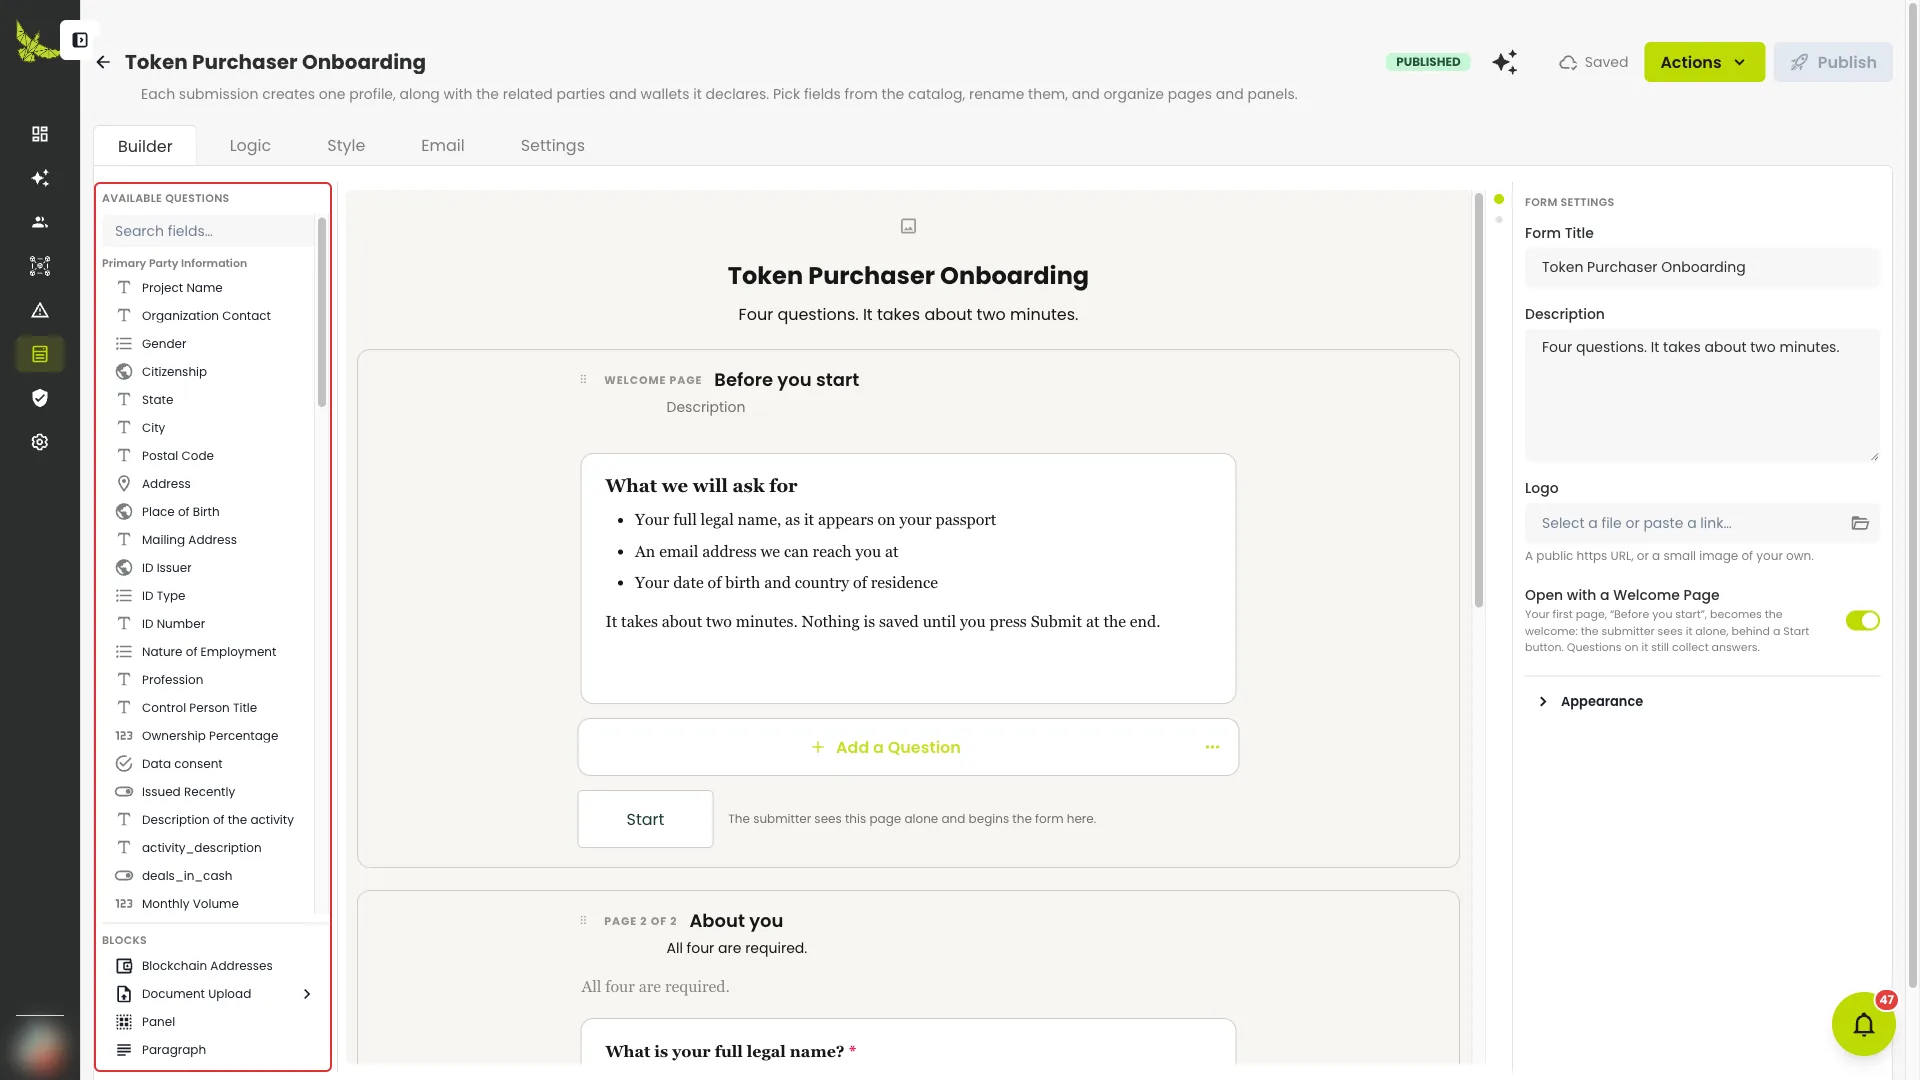
The middle is not a preview — it is the form. What you see is what a respondent sees.
- Left: every question your organization can ask, plus blocks (wallets, related parties, documents, panels, paragraphs).
- Middle: click a question to select it, type over its title in place, drag to reorder.
- Right: settings for whatever is selected — the form itself when nothing is.
Title, introduction, logo
Type over the title and introduction at the top of the canvas. A Logo takes a public https:// URL or a small upload.
Open with a Welcome Page turns your first page into a start screen: the respondent sees it alone behind a Start button, and its questions still collect answers.

Add a question
Search the left rail, or use Add a Question under any page to add it there. Questions already on the form stay visible and say so, rather than disappearing.
If the search finds nothing, the rail offers to create the field.
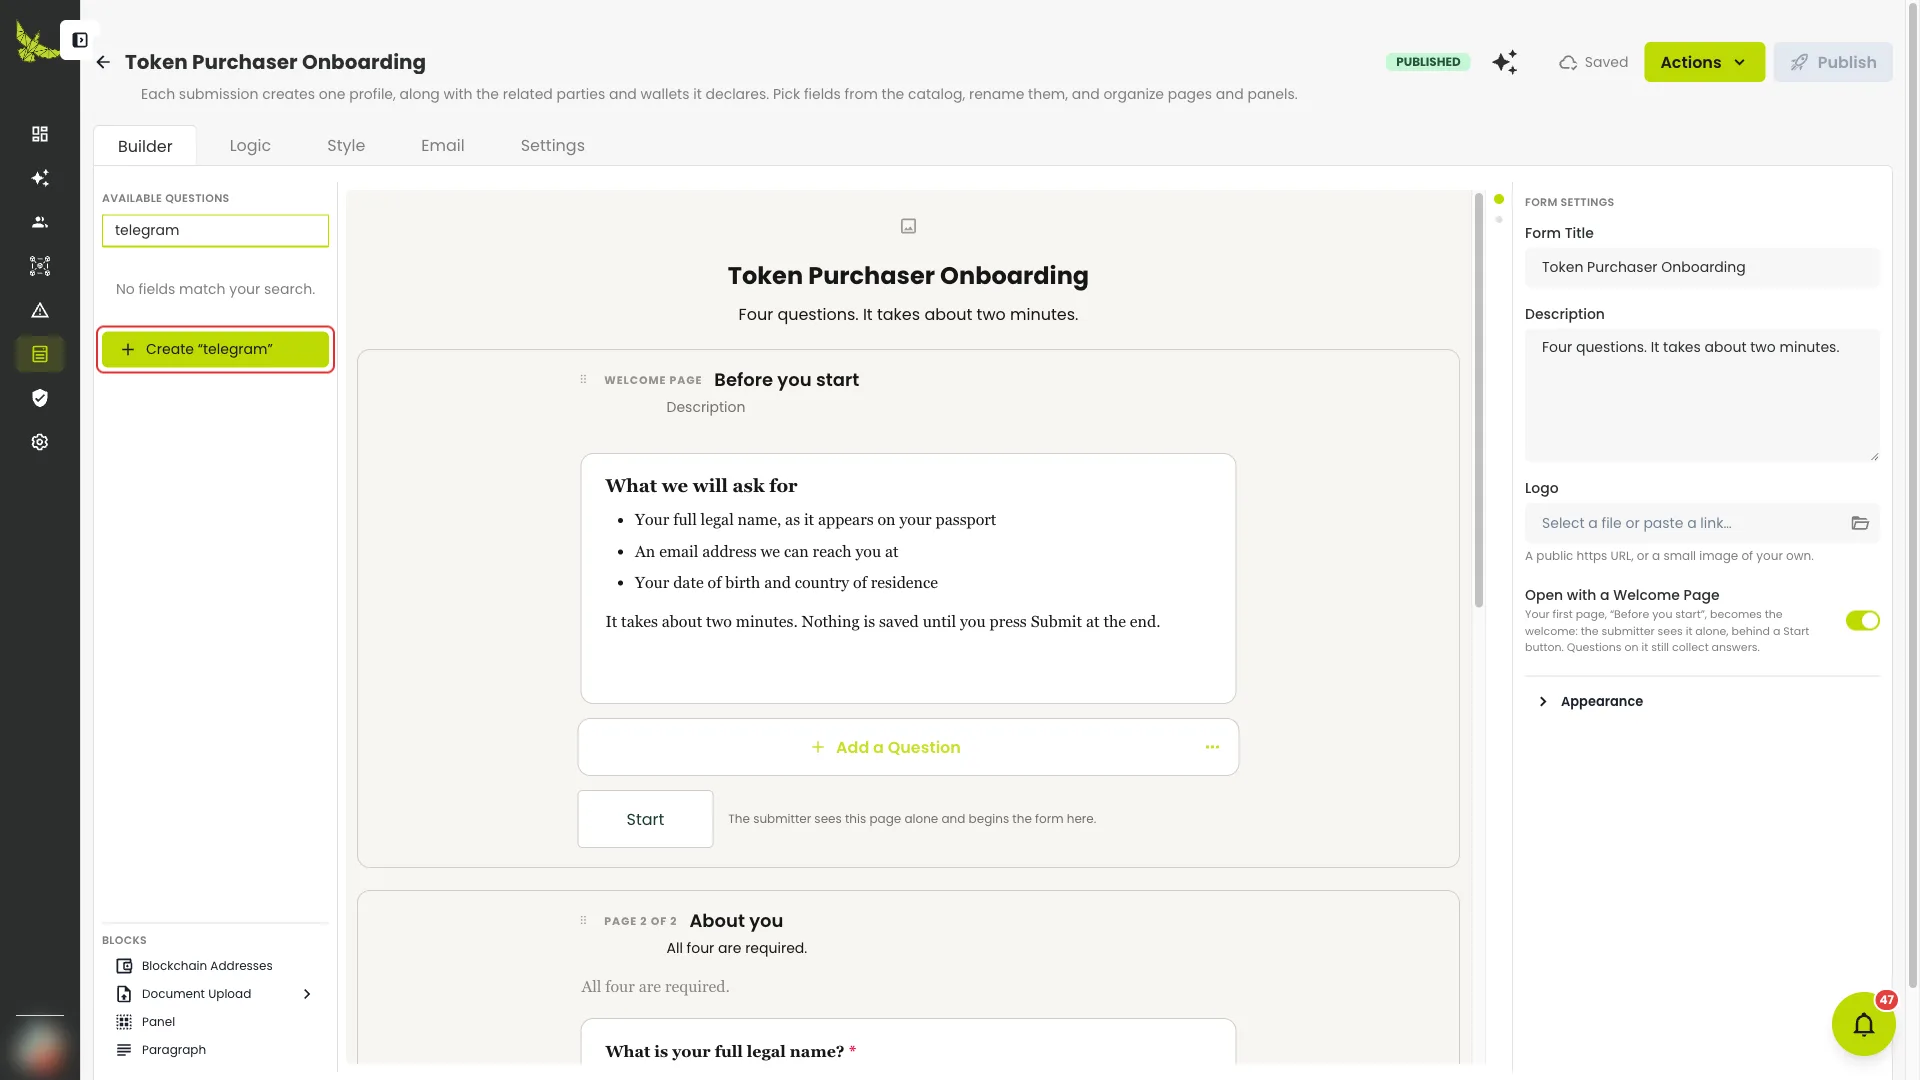
That opens the Custom Question dialog.
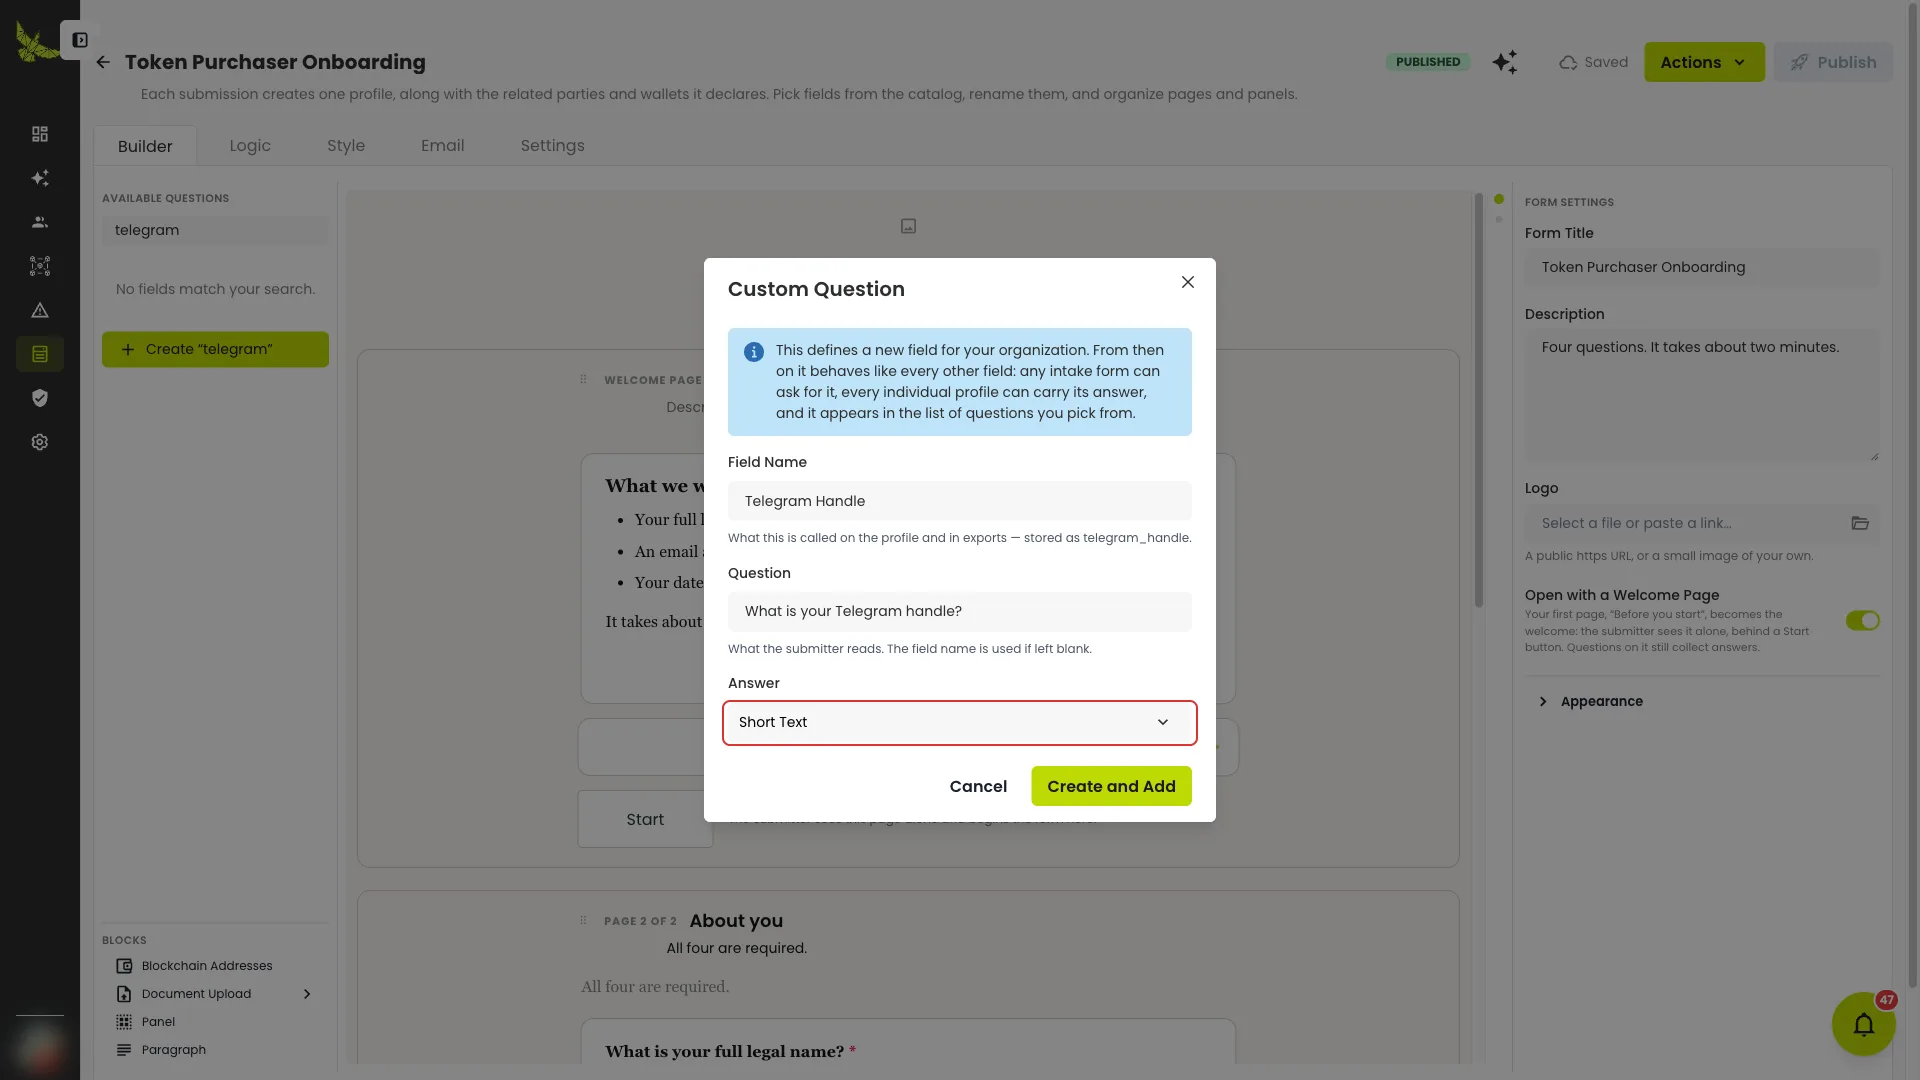
This defines a new field for your organization, not just for this form: every form can ask for it and every profile can carry its answer. Field names are stored in Title Case.
Question settings
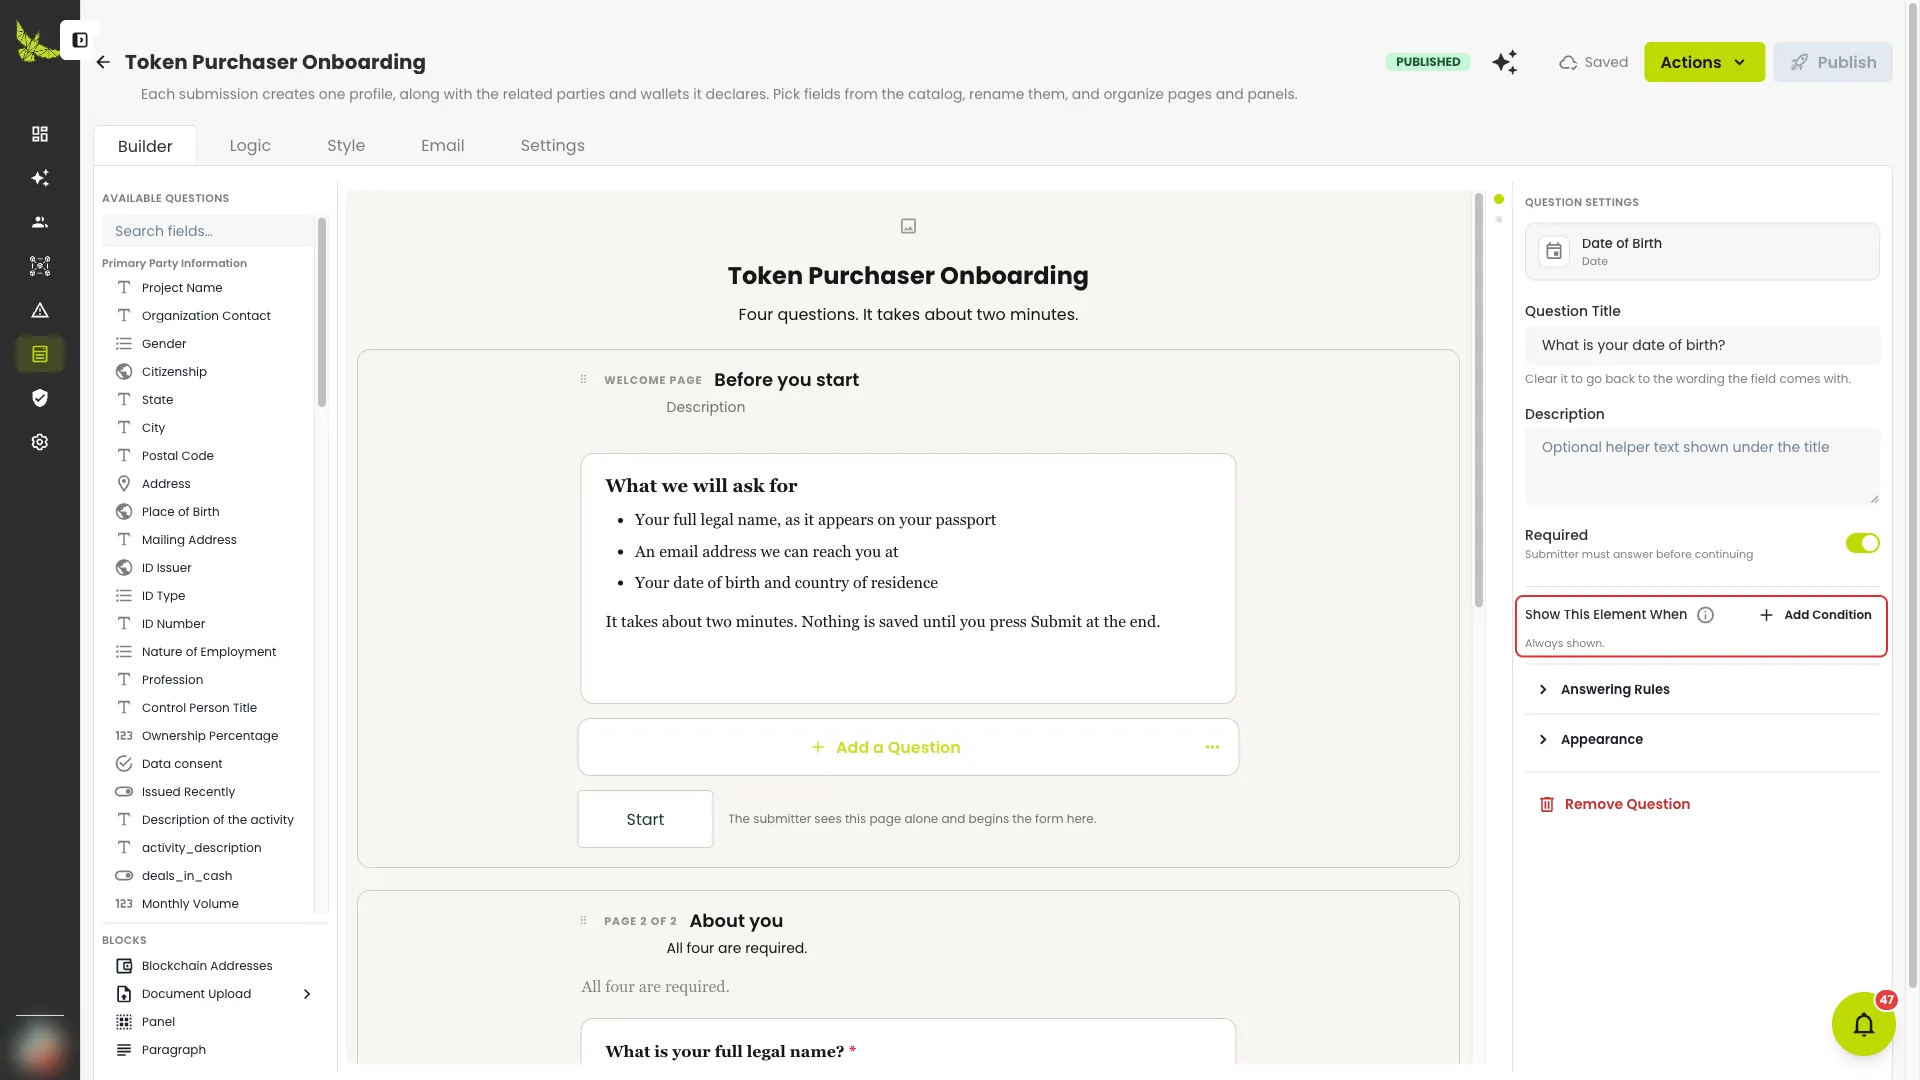
| Setting | What it does |
|---|---|
| Question Title | Overrides the catalog wording. Clear it to go back. |
| Description | Helper text under the title. |
| Required | Must be answered to continue. |
| Show This Element When | Hide it until a rule holds. |
| Answering Rules | Require it, or grey it out, conditionally. |
| Appearance | Placeholder, default value, side-by-side layout, widget. |
Lists: wallets and related parties
Blockchain Addresses and Related Party are repeating sections — the respondent presses "Add" for each one. Set a minimum to make at least one mandatory.
Each row's questions come from that section's own list, not the profile's. A UBO's name is the UBO's, not the applicant's.
Documents and consent
Document Upload offers one question per document type. A consent is a custom field of type Consent: a block of copy plus a checkbox per statement. What it leaves on the profile is a record of the copy shown and every statement's answer — including declined ones.
3 · Ask only what applies
Rules keep a long form short. Add one from Show This Element When on any question, page or section.
A rule reads as a sentence: show PEP position when PEP Declaration is Yes.
- Rules on a page apply to everything on it, and may only read answers from earlier pages.
- A rule can test several conditions with all or any.
- Rules on a repeating row read that row's own answers.
The Logic tab lists every rule in the form, grouped by the page a respondent meets it on.
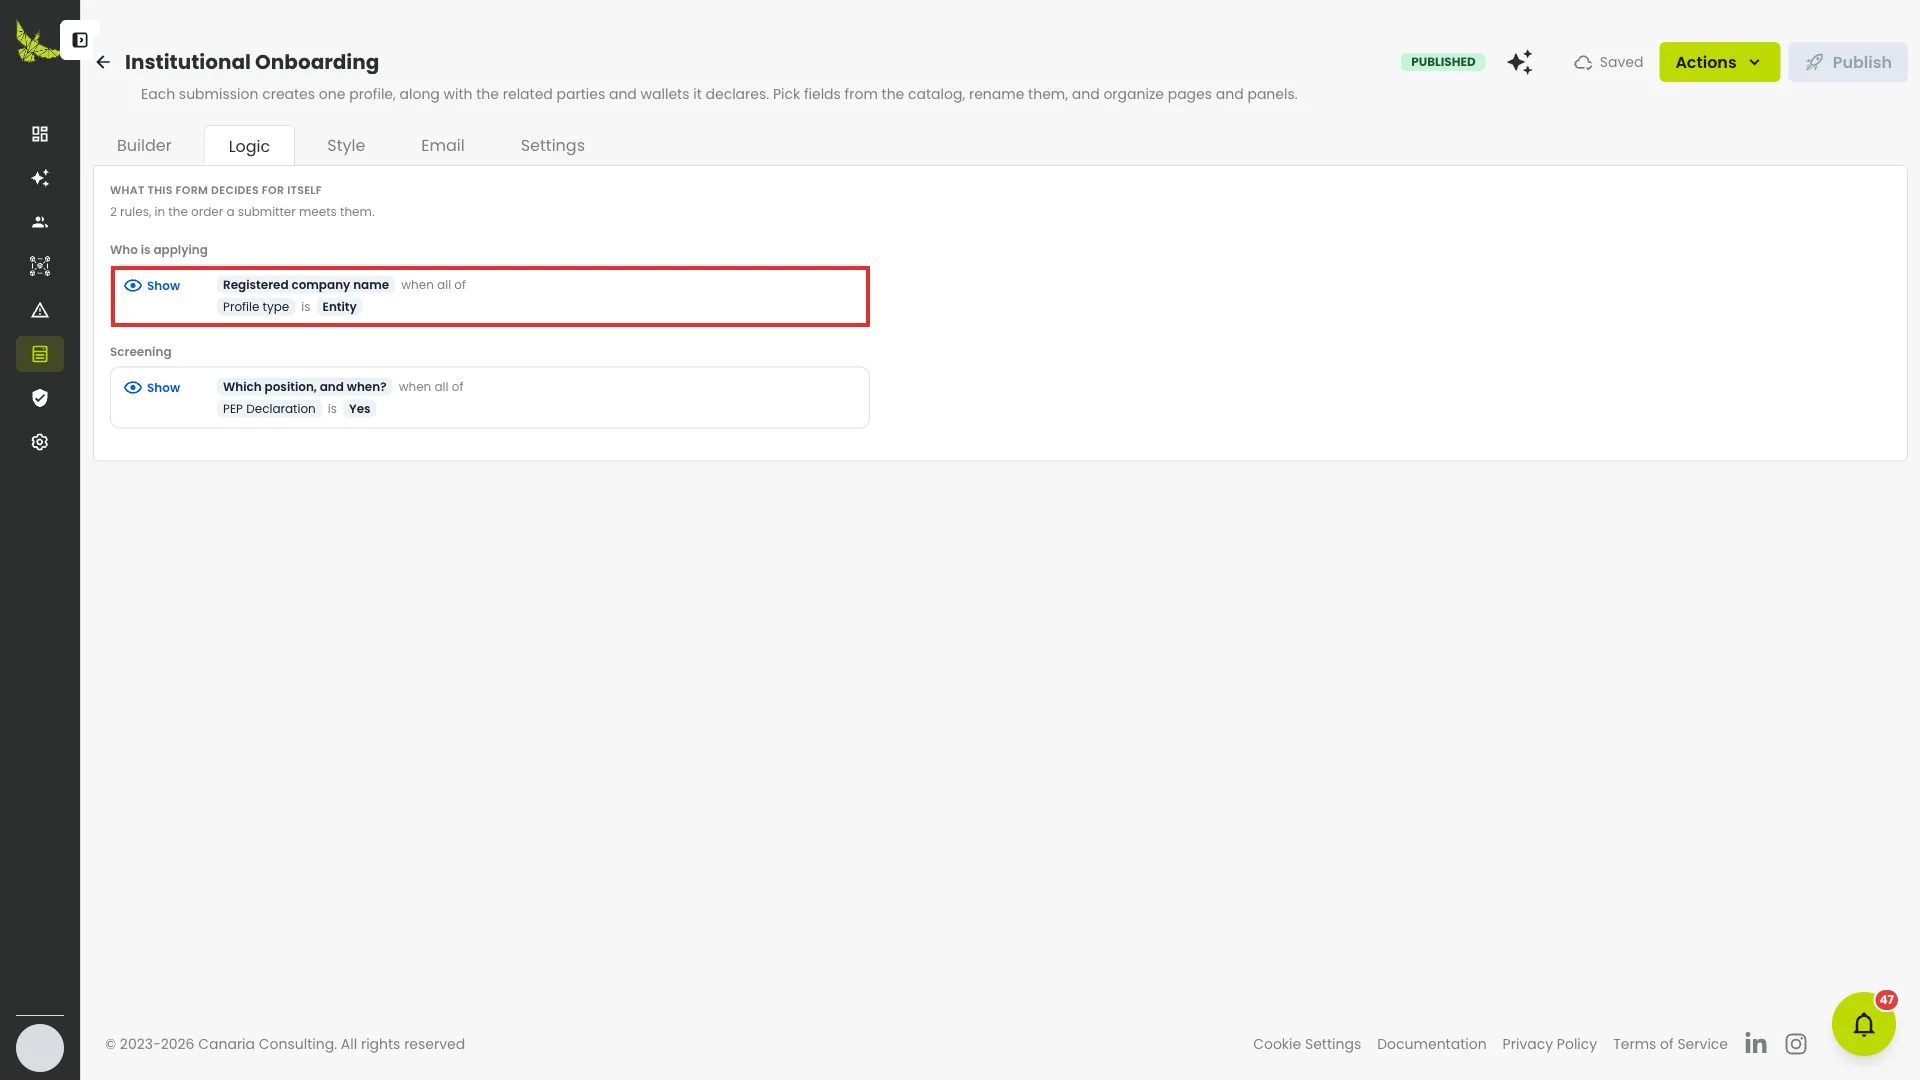
Each rule leads back to the question that carries it — you read here, you edit there.
4 · One form for people and companies
Leave Default Profile Type blank and the form asks. Then:
- Tag a question with the branch it belongs to, or leave it untagged to ask both.
- Ask Each Type Differently splits a shared question into two — one worded for a person, one for a company.
- Every branch must reach a name question, or publishing refuses.
5 · Make it look like theirs
The Style tab: controls on the left, a live preview of the real form on the right.
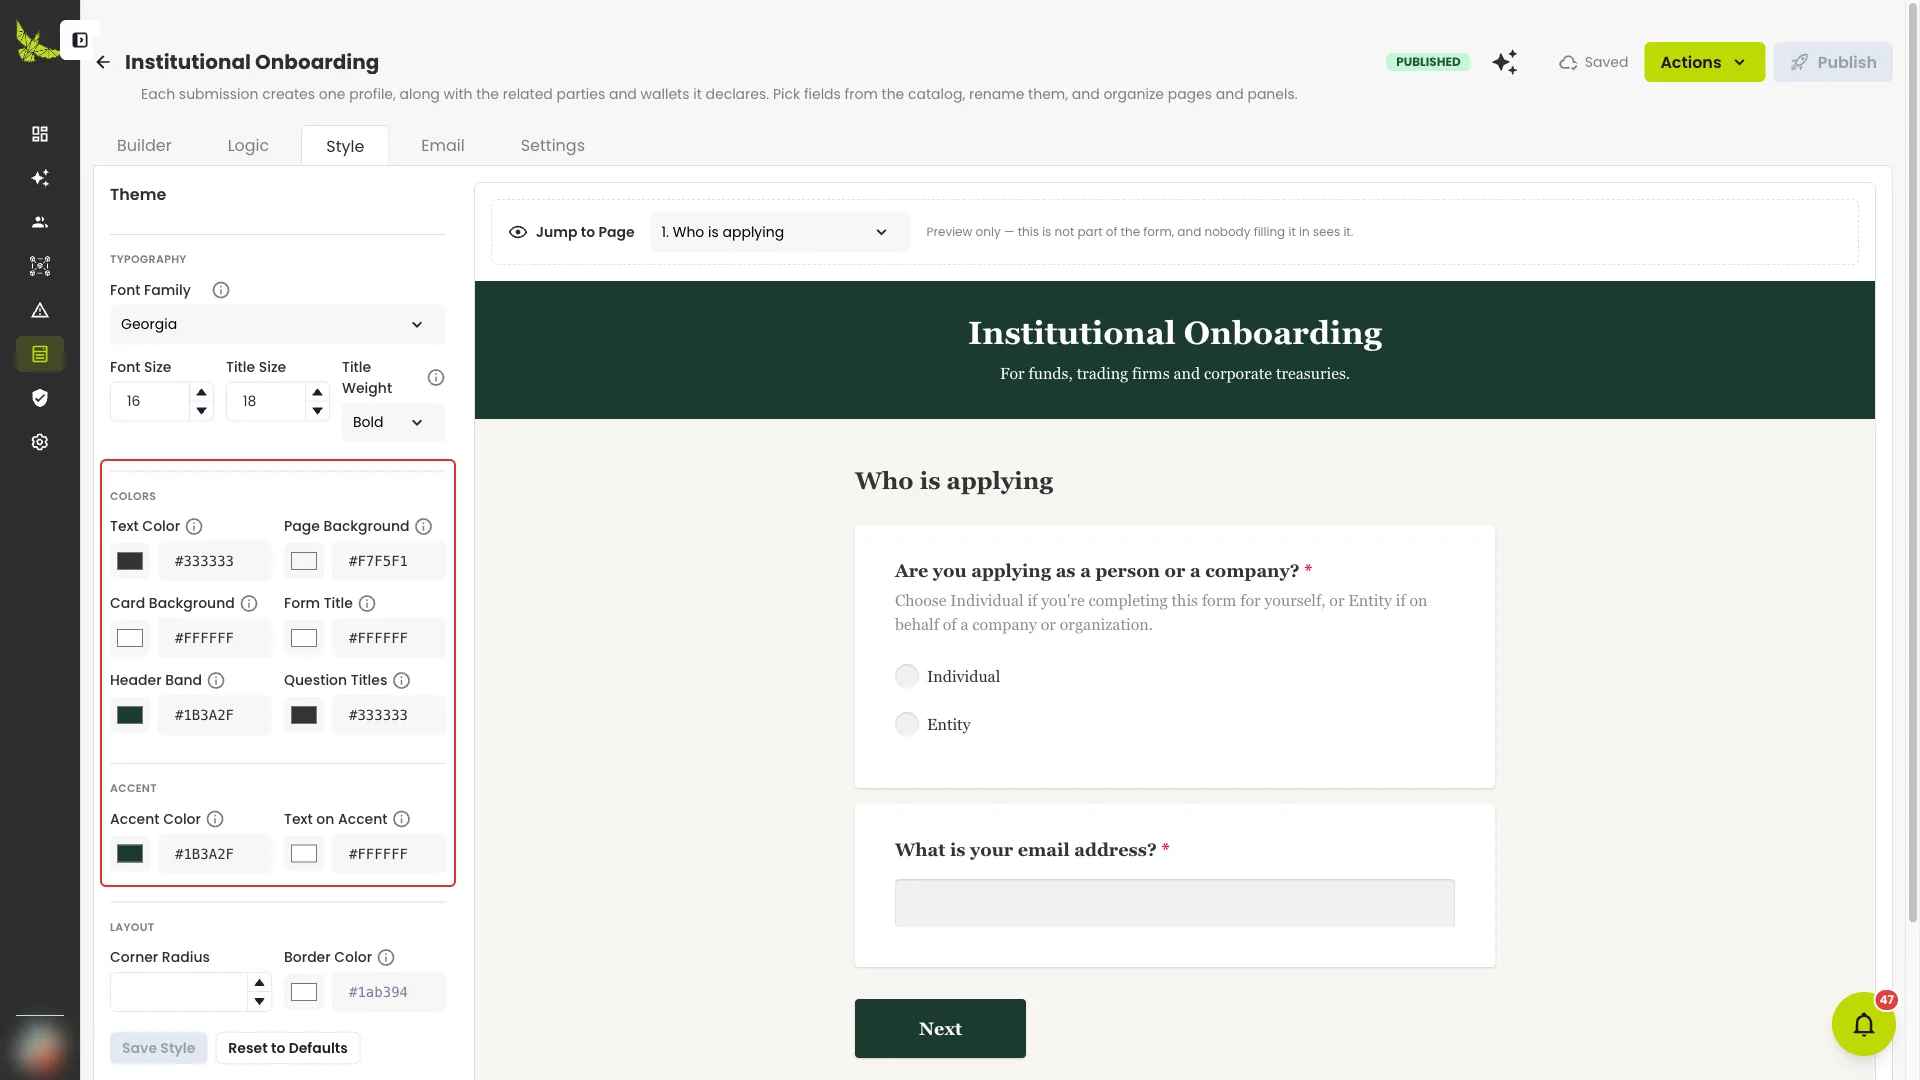
| Group | Covers |
|---|---|
| Typography | Font, sizes, question-title weight |
| Colors | Page and card backgrounds, text, header band |
| Accent | Every button the respondent presses, selected options, focus rings, links |
| Layout | Corner radius, borders, how wide the form sits |
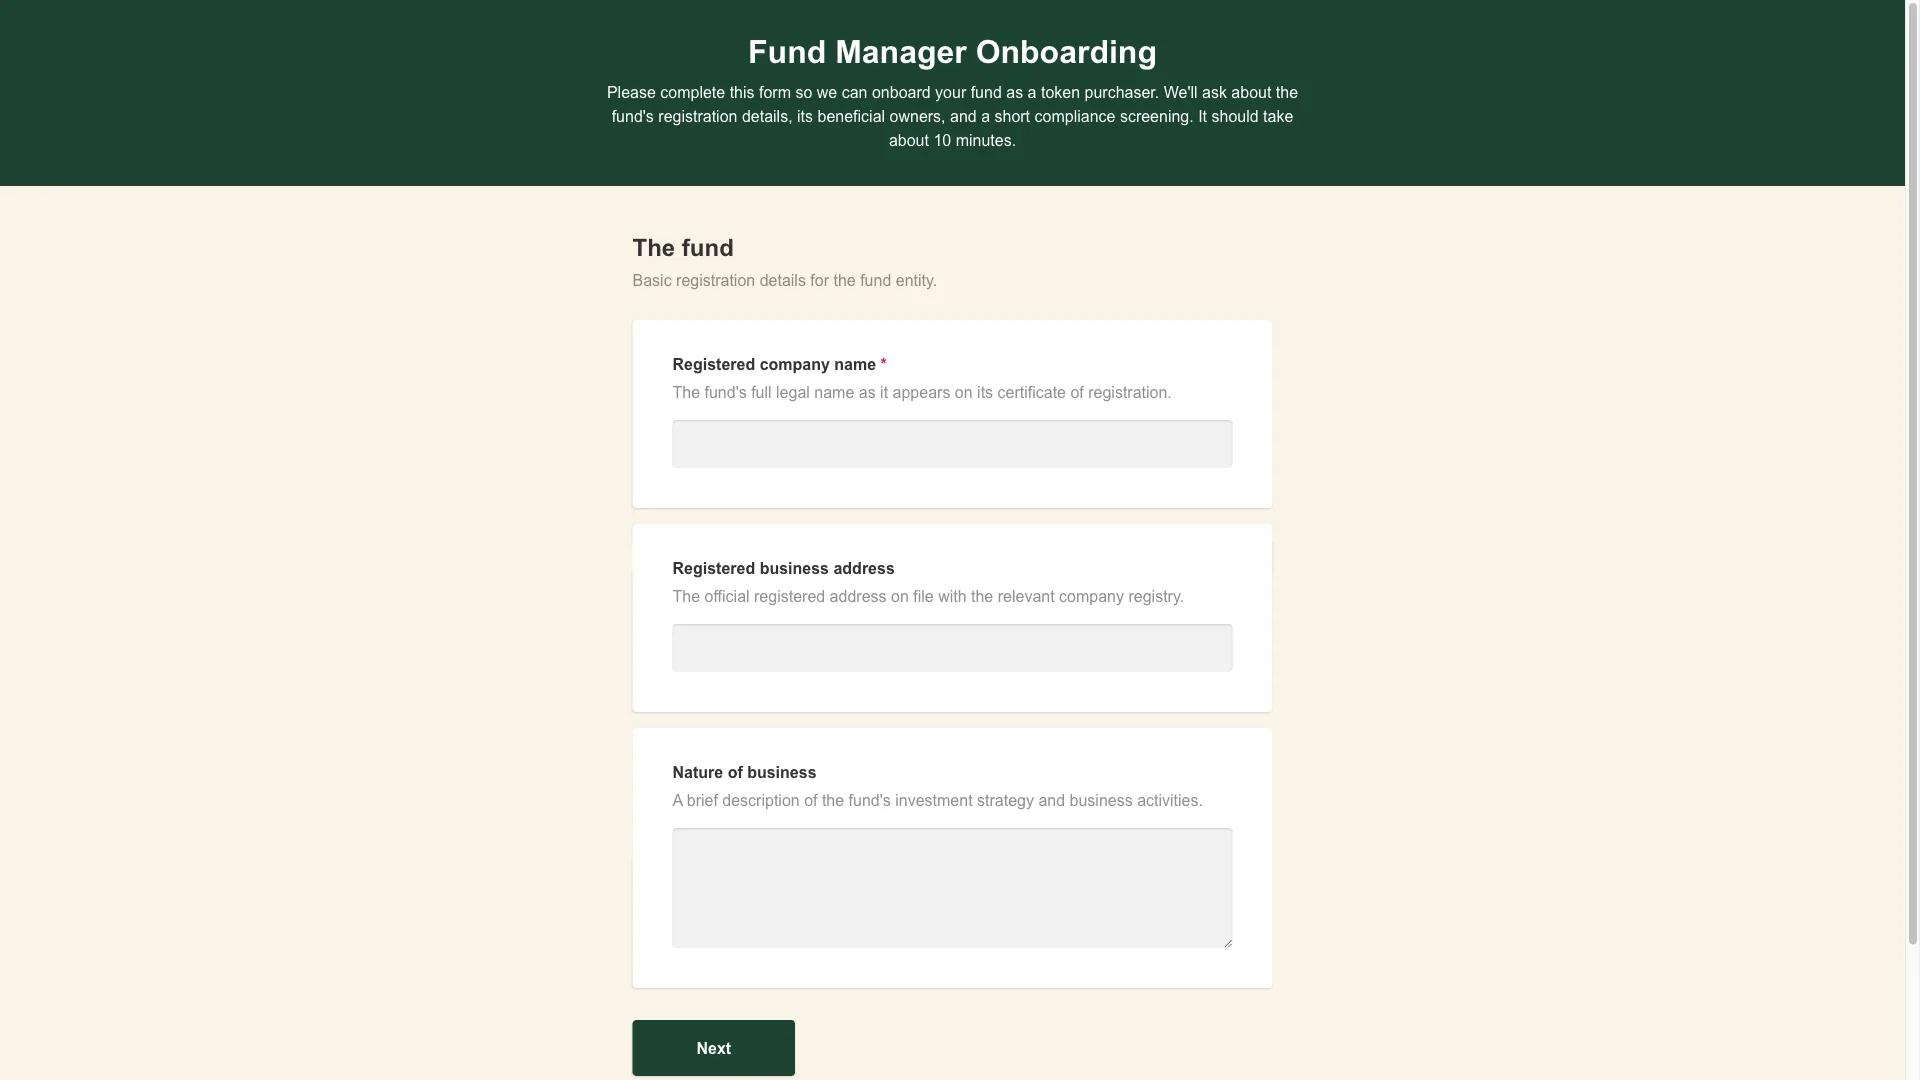
Two rules worth following: whenever you change the accent, set the text on it to something that contrasts; and if you set a header band, set the header text light enough to read on it.
How Wide the Form Sits defaults to one centered, readable column, widening only on a page whose rows hold two questions side by side.
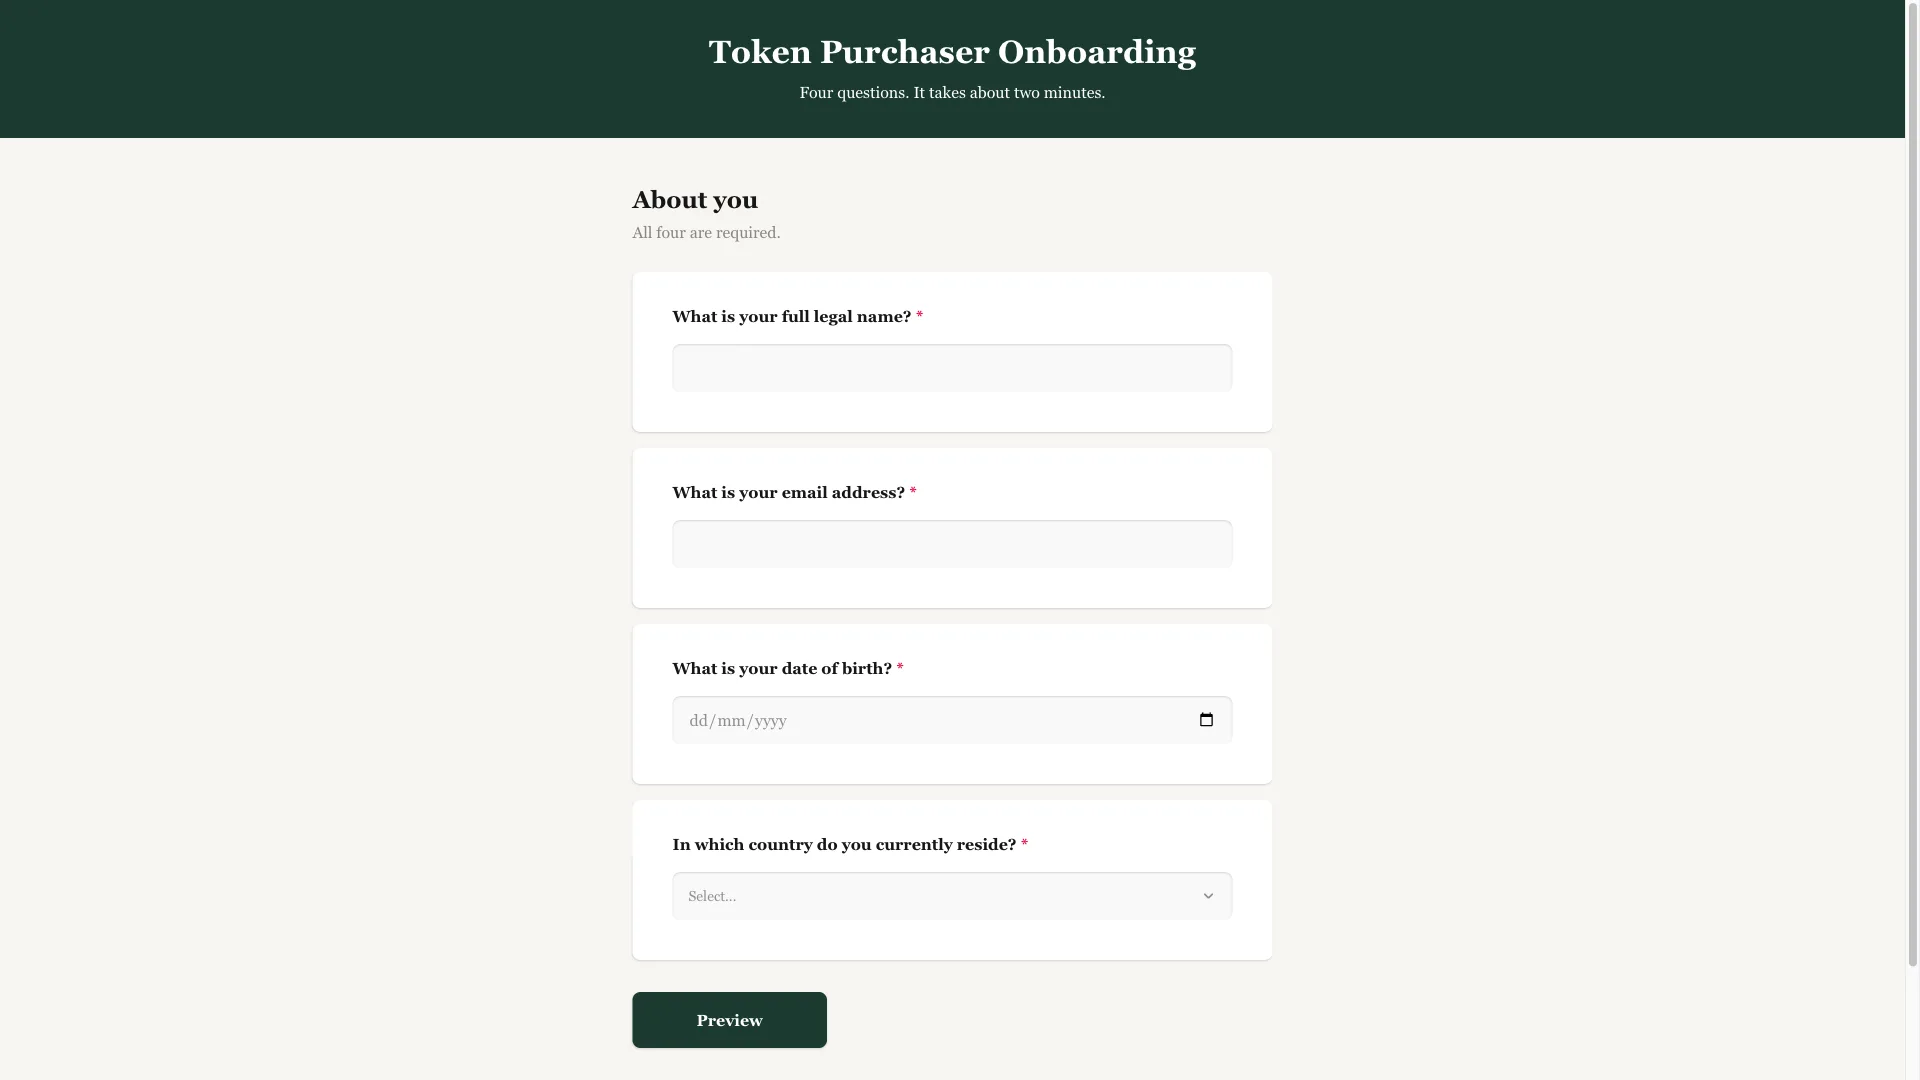
Here it is on the public form:
6 · Write the email
For most recipients the email arrives before the form. The Email tab edits it, with a live preview.
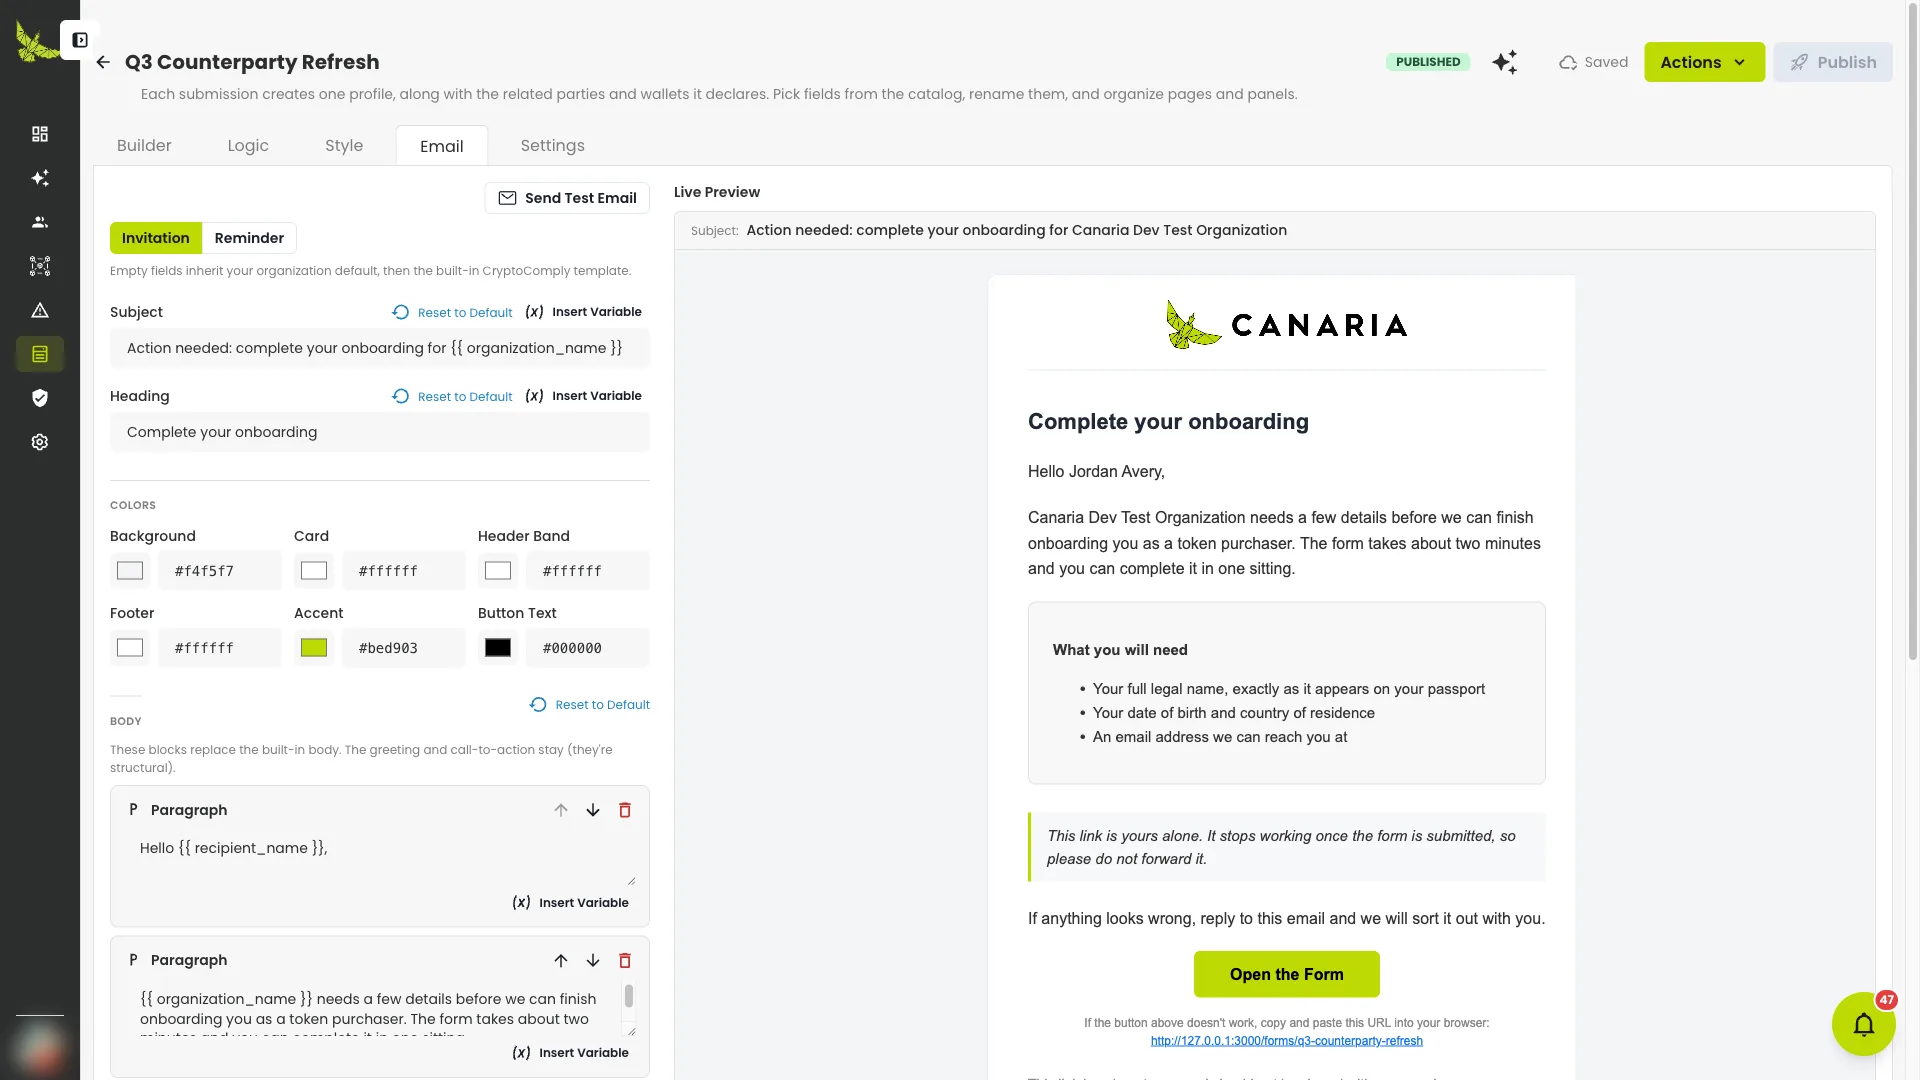
- Empty fields inherit your organization's default, then CryptoComply's template.
- Insert Variable drops in
,and others. - Switch between Invitation and Reminder at the top — the reminder is its own email.
- Send Test Email sends it to you.
An override is only stored where your words differ from the inherited ones, so an organization-wide change still reaches every form that never disagreed.
7 · Settings
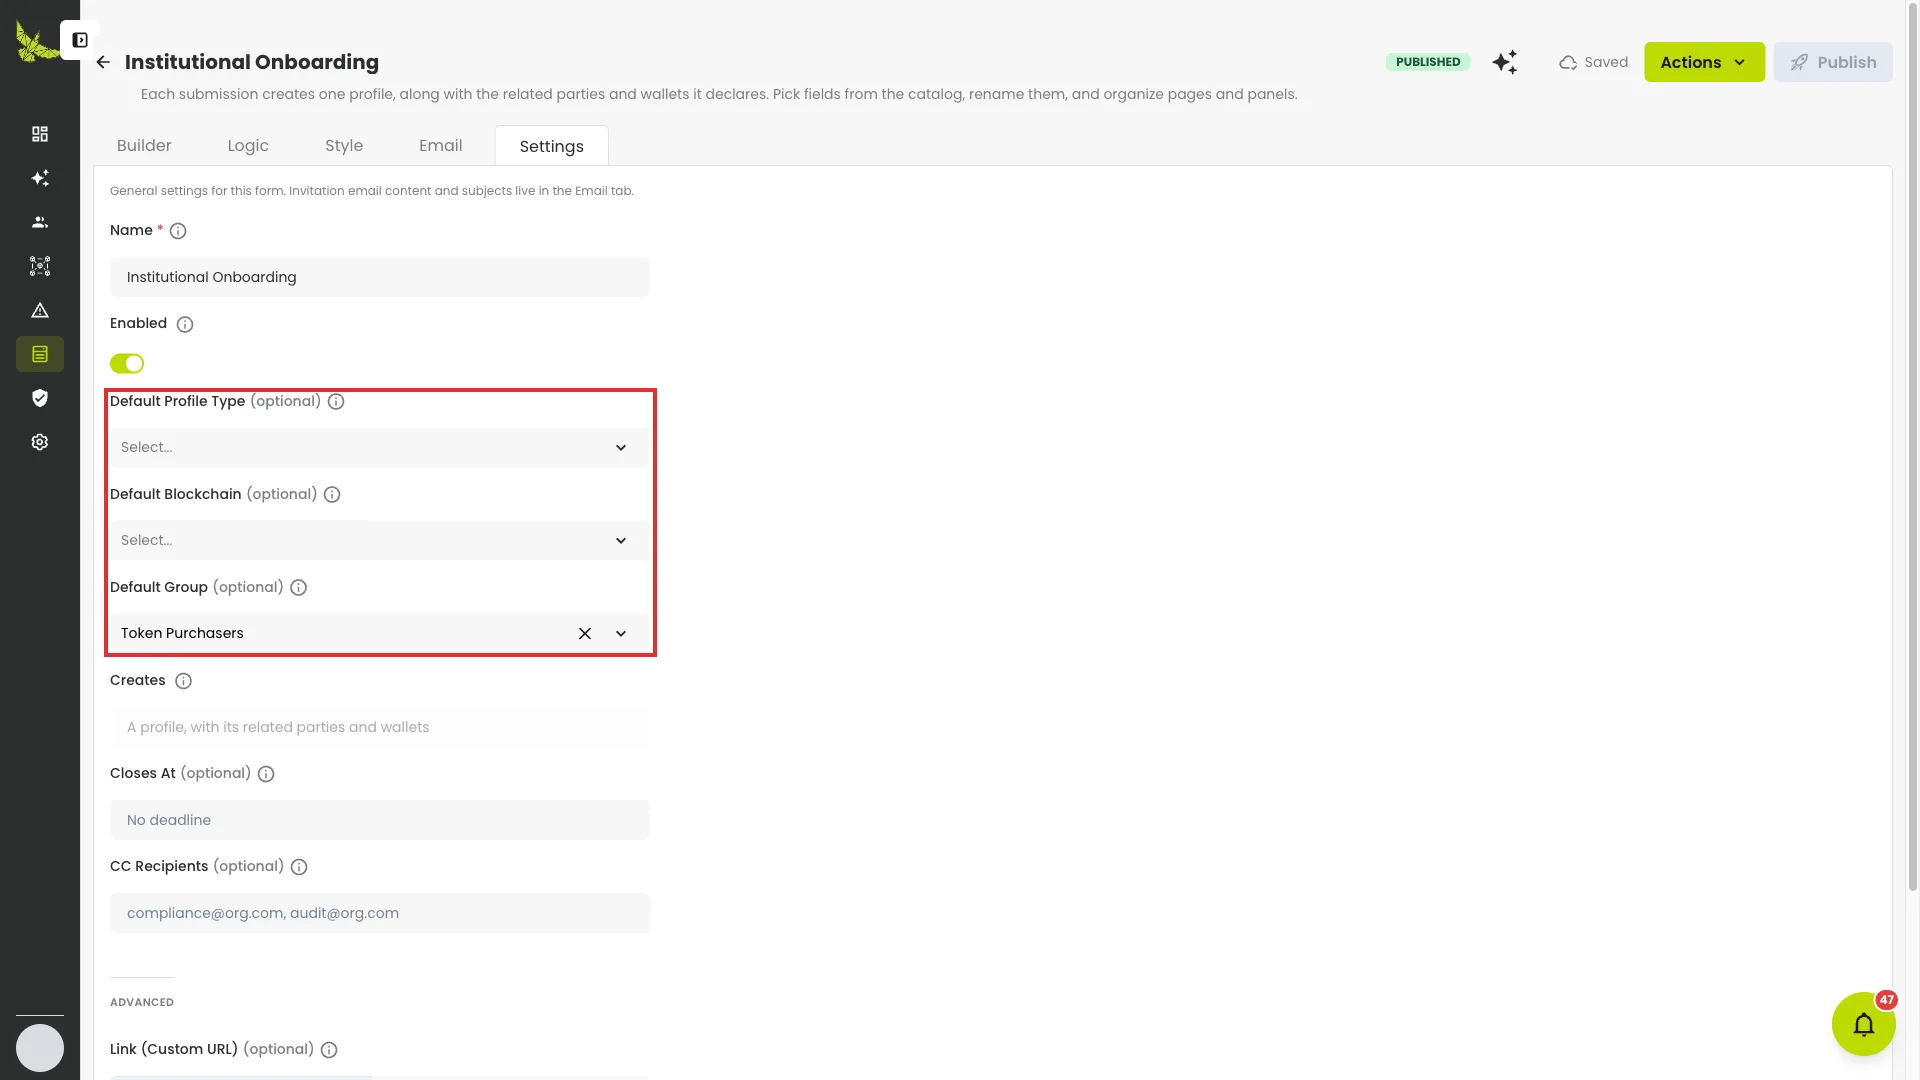
| Setting | Notes |
|---|---|
| Name | Internal. Respondents never see it. |
| Enabled | Off takes the form offline immediately. |
| The three defaults | Frozen once published — unpublish to change them. |
| Closes At | A deadline, after which the link stops working. |
| CC Recipients | Copied on every invitation this form sends. |
| Link (Custom URL) | The address respondents get. |
8 · Test before you publish
Actions → Test opens the form as a respondent sees it, runs your answers through the real ingest, and reports exactly what would have been created — the profile, its related parties, its wallets, and anything that would have blocked it.
Nothing is written. No profile, no addresses, no screening, no submission in the list. A test invitation is marked as a test and never counts in the funnel. Test the form and the emails as often as you like; the data leaves no trace.
9 · Publish
Publish freezes what respondents will answer. Refusals name the element and frame it on the canvas:
| Refusal | Fix |
|---|---|
| No questions | Add at least one. |
| No name question | Add full legal name, or first + last. |
| A branch never reaches a name | Show a name question to that branch too. |
| Neither fixed nor asked | Set a default, or add its question. |
| A question this group hides | Remove it, or narrow the rule to groups that offer it. |
| A rule reads a question the form does not ask | Restore the question, or drop the rule. |
| An empty paragraph | Write it, or remove it. |
Unpublished changes
After publishing, edits go to the draft. Respondents keep answering the published copy until you publish again — so a half-finished edit never reaches anyone.
The header says Unpublished changes when the two differ. Actions → Discard Draft throws your edits away and returns the draft to what is live.
10 · Share and track
Open forms have one link that anyone can use — copy it from the form's page.
Invitation-only forms are sent per person: Send Invitations, one address per line. Each recipient gets a private link that stops working once used or expired.
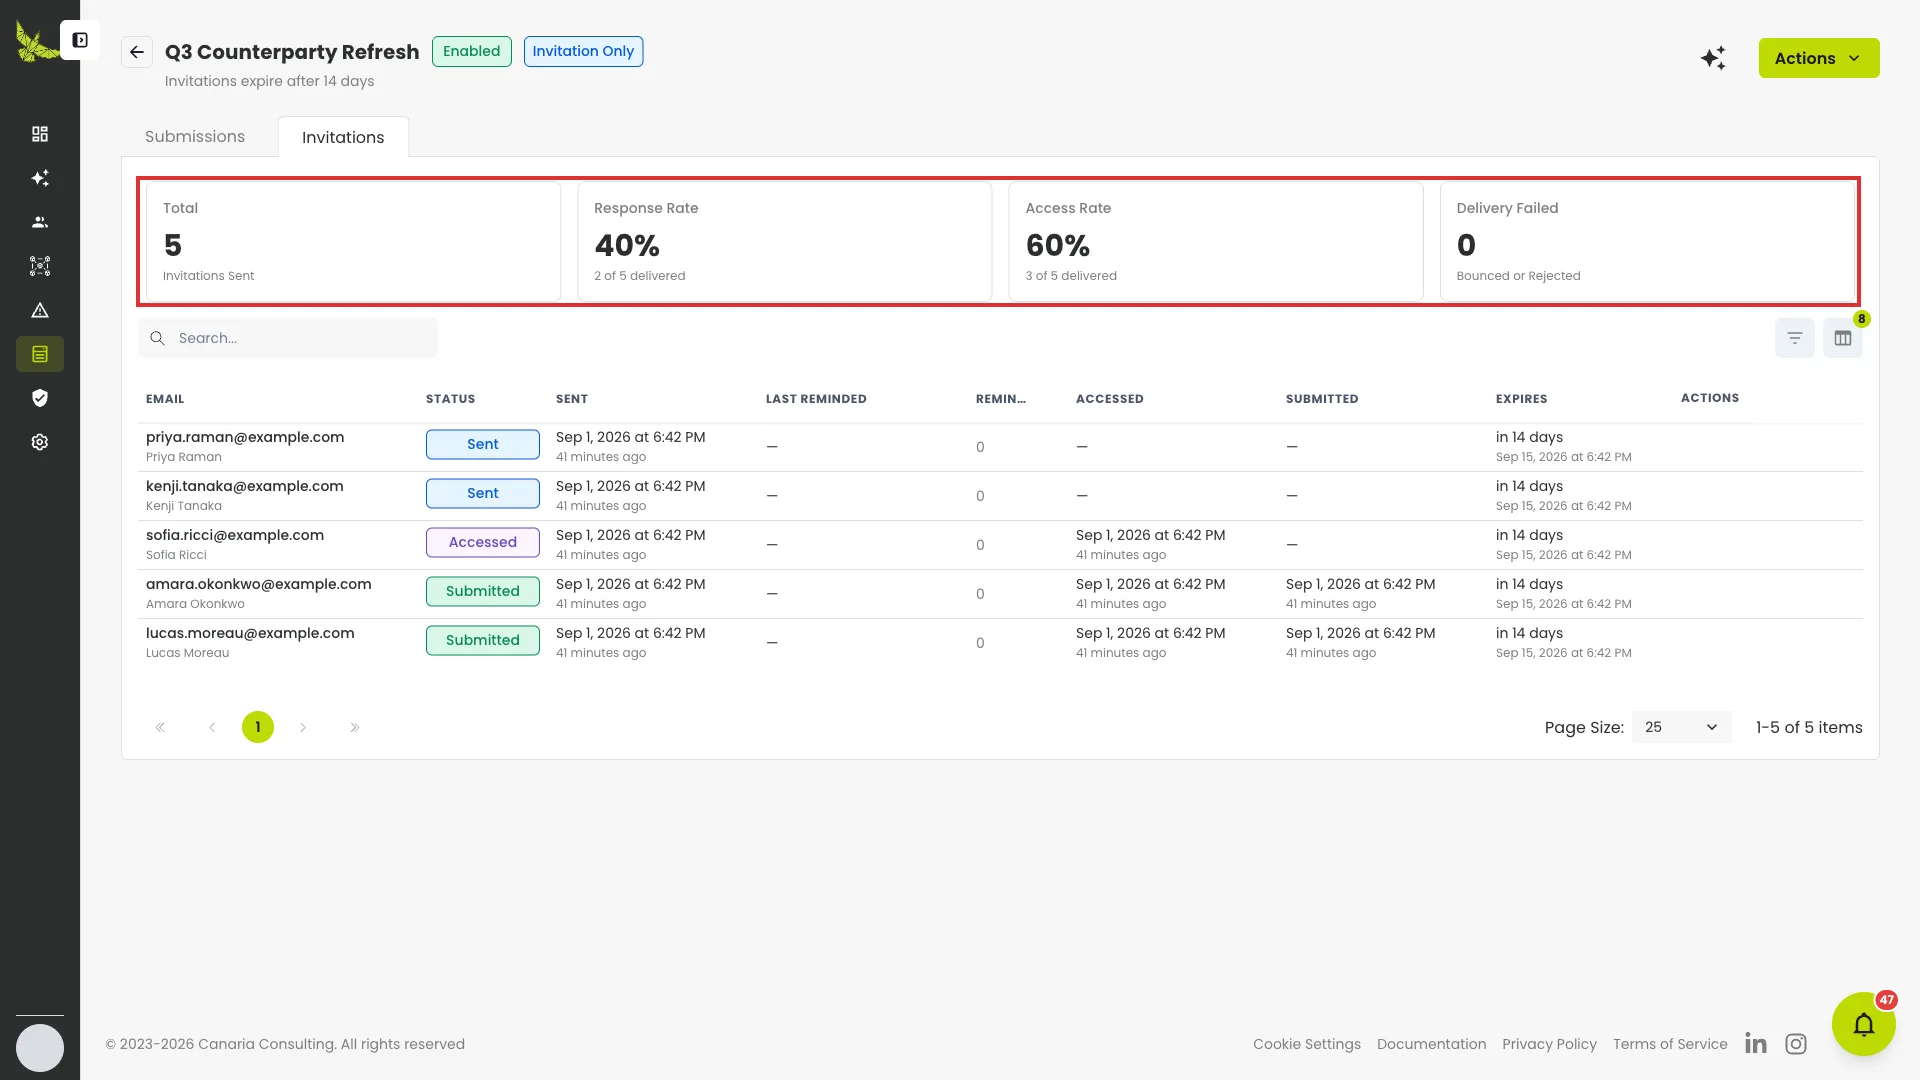
Each row tracks one recipient through Pending → Sent → Accessed → Submitted, with Delivery failed, Revoked and Expired as off-ramps. Rows can be resent or revoked; Send Reminders nudges only those who have not answered.
The Submissions tab lists what came back, what it created, and why anything failed. A failure you have reviewed can be dismissed so it stops asking for attention.
Build it by asking
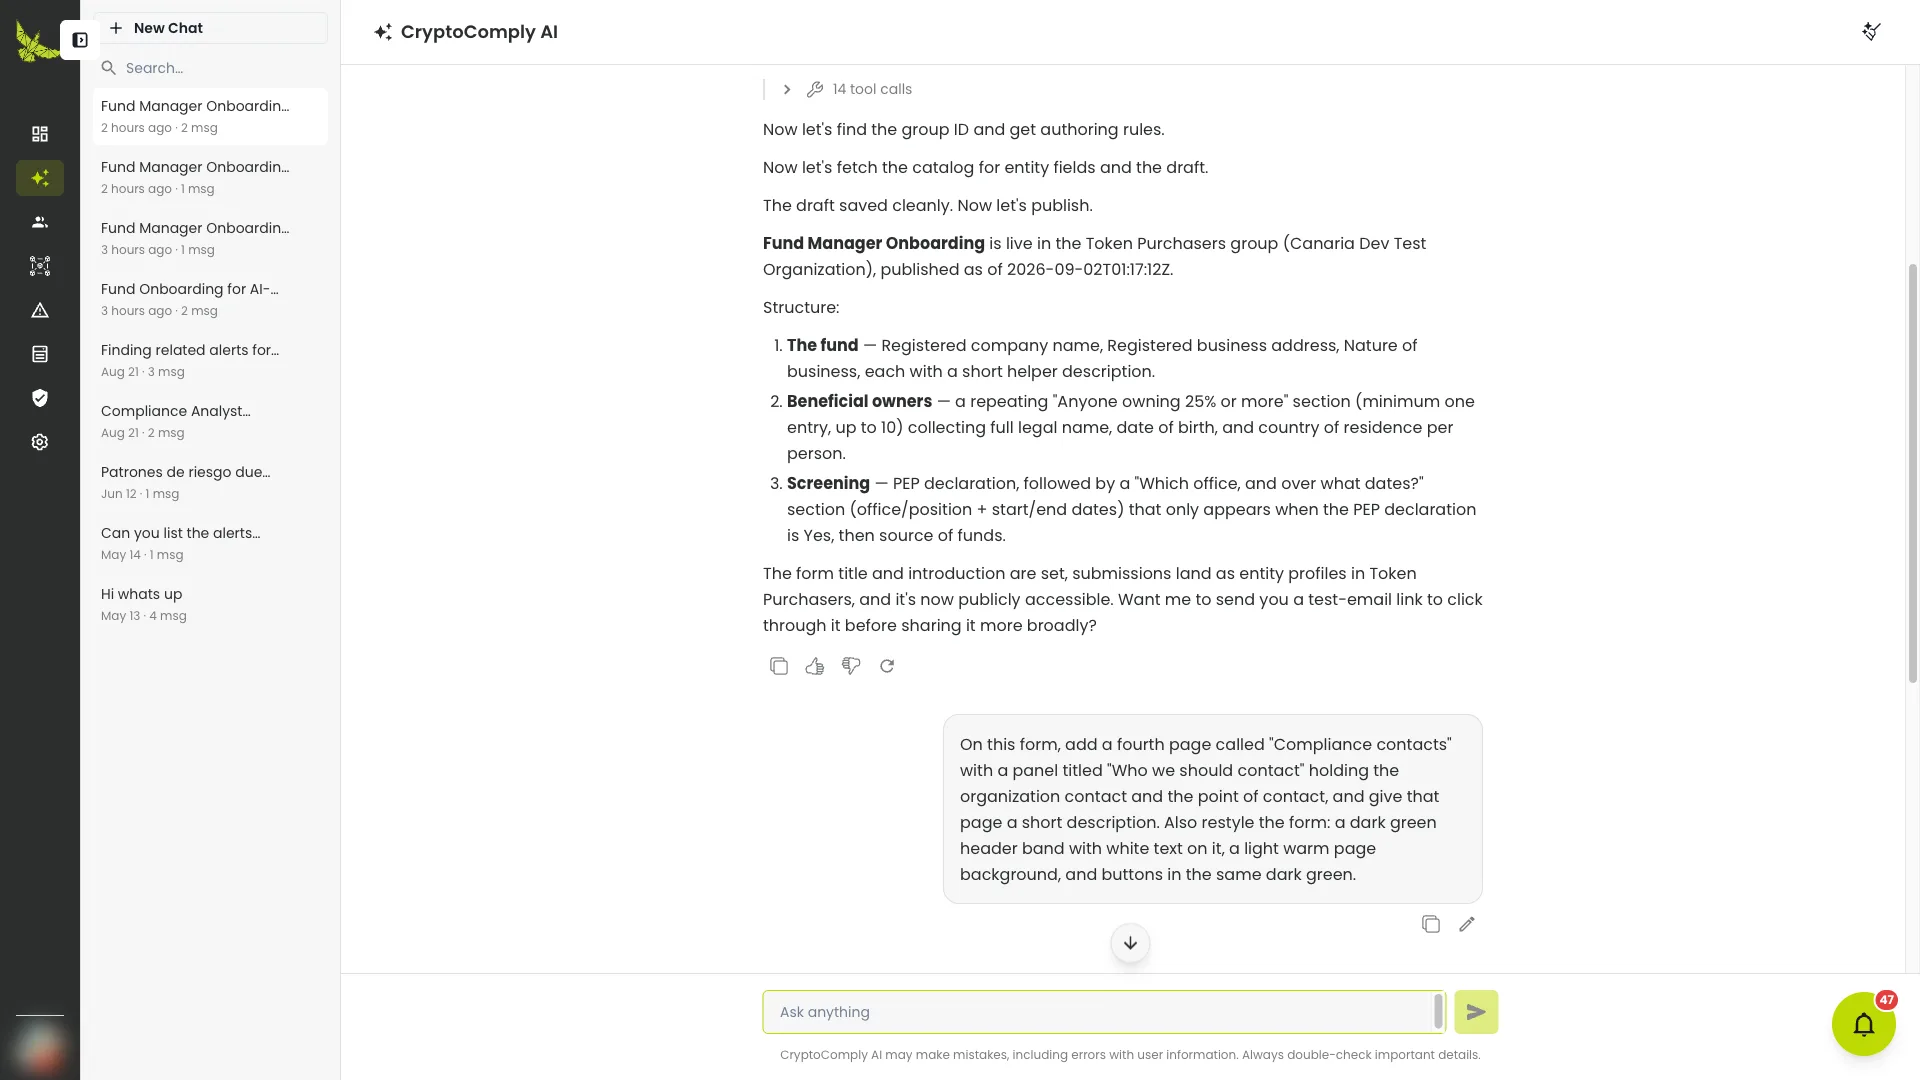
Everything above can also be done in plain language through CryptoComply AI, which drives the same tools the editor does. One request is enough to get a whole form:
Build an intake form in the Token Purchasers group called Fund Manager Onboarding, a profile form for entities, with three pages: "The fund" asking registered company name, registered business address and nature of business, each with a short helper description; "Beneficial owners" holding a repeating section titled "Anyone owning 25% or more" that asks full legal name, date of birth and country of residence per person, minimum one; and "Screening" asking the PEP declaration, then a follow-up shown only when it is Yes, retitled to "Which office, and over what dates?", plus source of funds. Give it a title and an introduction, then publish it.
That builds the pages, the reworded questions, the helper text, the repeating section and the conditional follow-up — and publishes. Every step is listed as it goes, so you can see exactly what it did rather than take its word for it.
Keep going from the editor
Open any form and the CryptoComply AI button in its header carries the conversation into the page you are looking at, so you can keep editing without describing which form you mean:
Add a fourth page called "Compliance contacts" with a panel titled "Who we should contact" holding the organization contact and the point of contact. Also restyle the form: a dark green header band with white text on it, a light warm page background, and buttons in the same dark green.
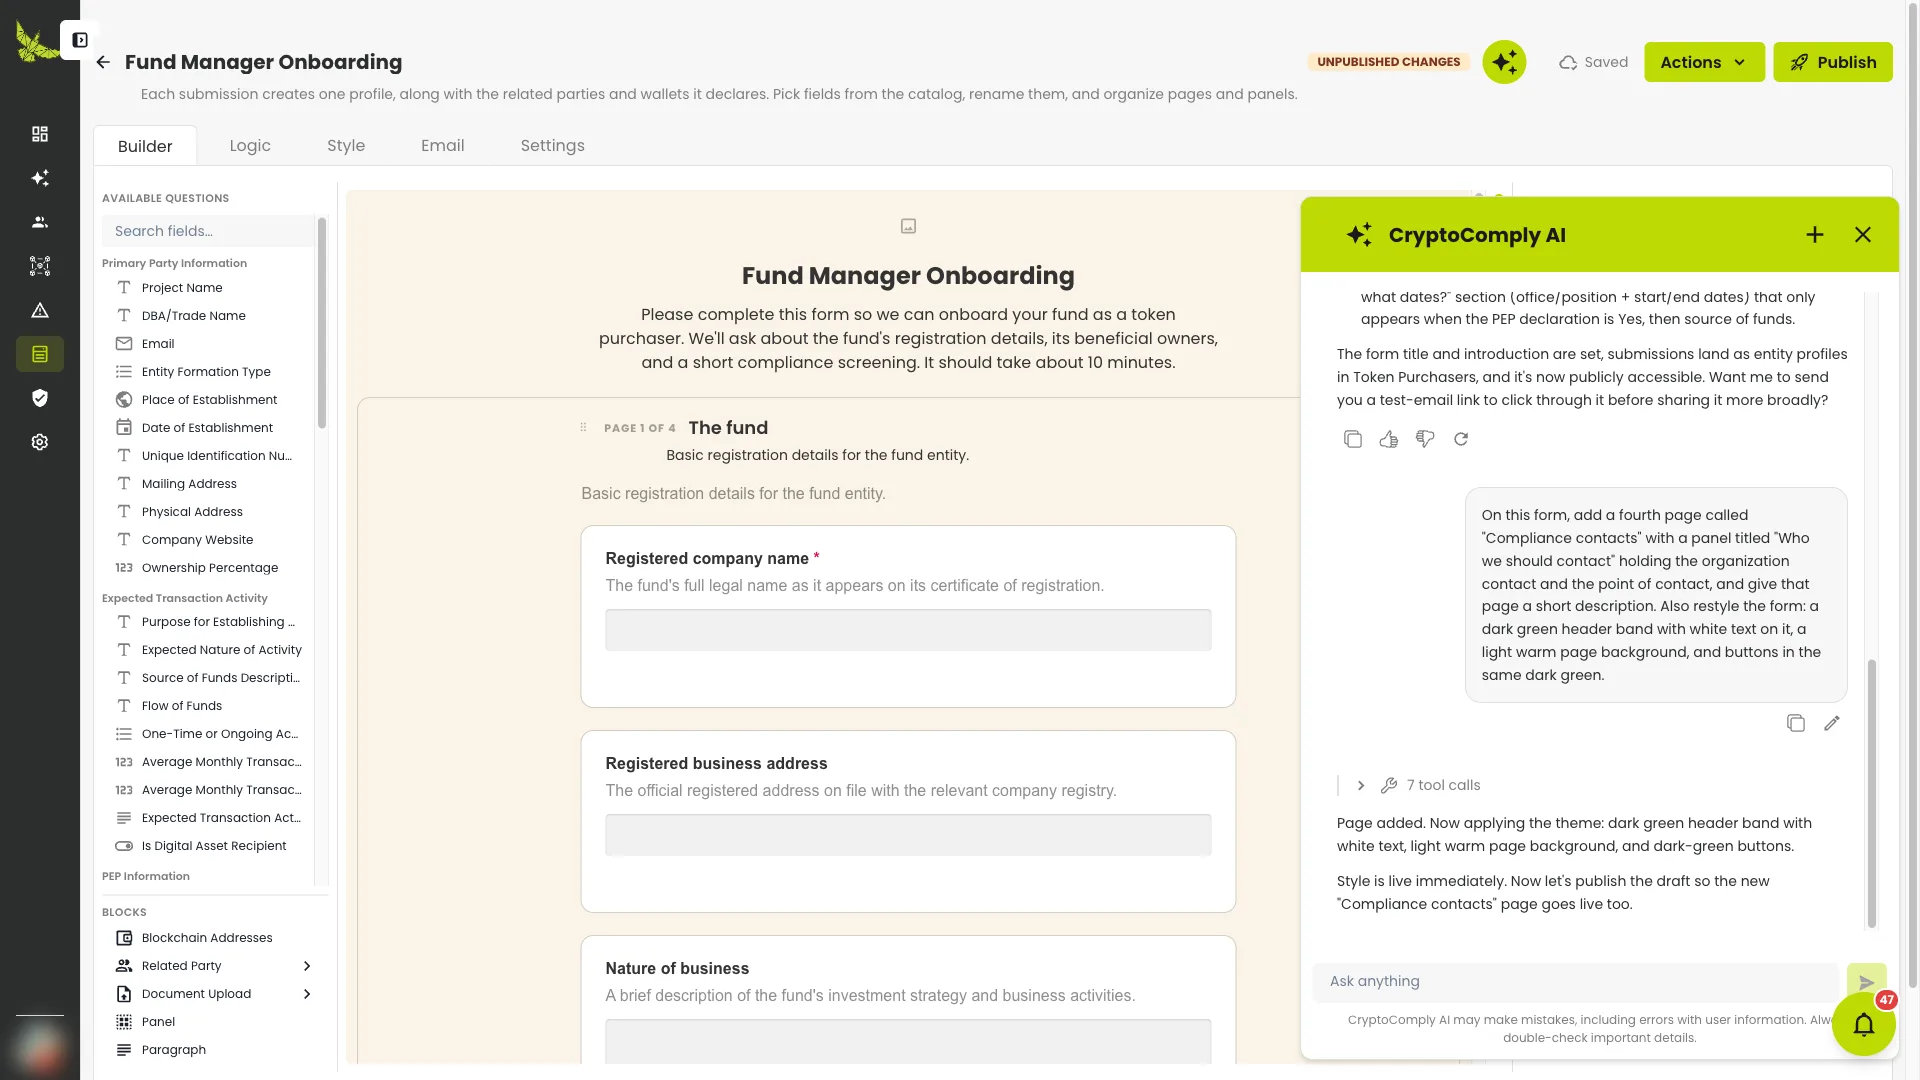
It works on the draft, and the header shows Unpublished changes until you publish — so you review what it did before anyone sees it.
It asks before writing, showing exactly what will change. The same checks apply — it cannot publish a form you could not have published yourself.
Worked examples
| Goal | Shape |
|---|---|
| Four facts about a person | One page, four required questions, a fixed group and profile type. |
| A long form that does not overwhelm | Several pages, panels for grouped questions, a progress bar. |
| Ask only what applies | One yes/no question gating a page of follow-ups. |
| A company, its people, its wallets | Entity form + a UBO repeating section + a wallets section. |
| Wallets only | An address form: no profile, no group, one wallets section. |
Troubleshooting
| Problem | Cause |
|---|---|
| Publish is greyed out | Nothing changed since the last publish. |
| A field is missing from the rail | Its group's layout hides it, or it is not externally requestable. |
| A rule cannot find a question | Rules read answers from earlier in the form only. |
| The link 404s | The form is disabled, past its deadline, or never published. |
| An invitation says Delivery failed | The address bounced. Fix it and resend. |
| A submission failed | Open it — the reason names the answer that could not be stored. |